When responding to a radiological emergency, the scene will lack initial characterization to make a determination of a control zone bounded by an external dose rate or contamination level. In such instances, zones based on distance have been developed by several organizations to inform initial scene size-up and approach. Local procedures governing response to these types of incidents have precedence over guidance provided here. For incident specific Recommendations, contact the Advisory Team for Environment, Food and Health (A-Team) via FDA EOC: 866-300-4374.
Summary of Recommended Zones defined
by Distance
|
|
PROTECTION ZONES based on distance (before measurements are
made) |
||||||
|
Reference |
Applies to |
Zone Name |
Initial Zone Demarcation |
Text from Reference |
Suggested Action |
Discussion |
|
DOT Emergency Response Guidebook (DOT,
2016)
|
Transportation Incidents |
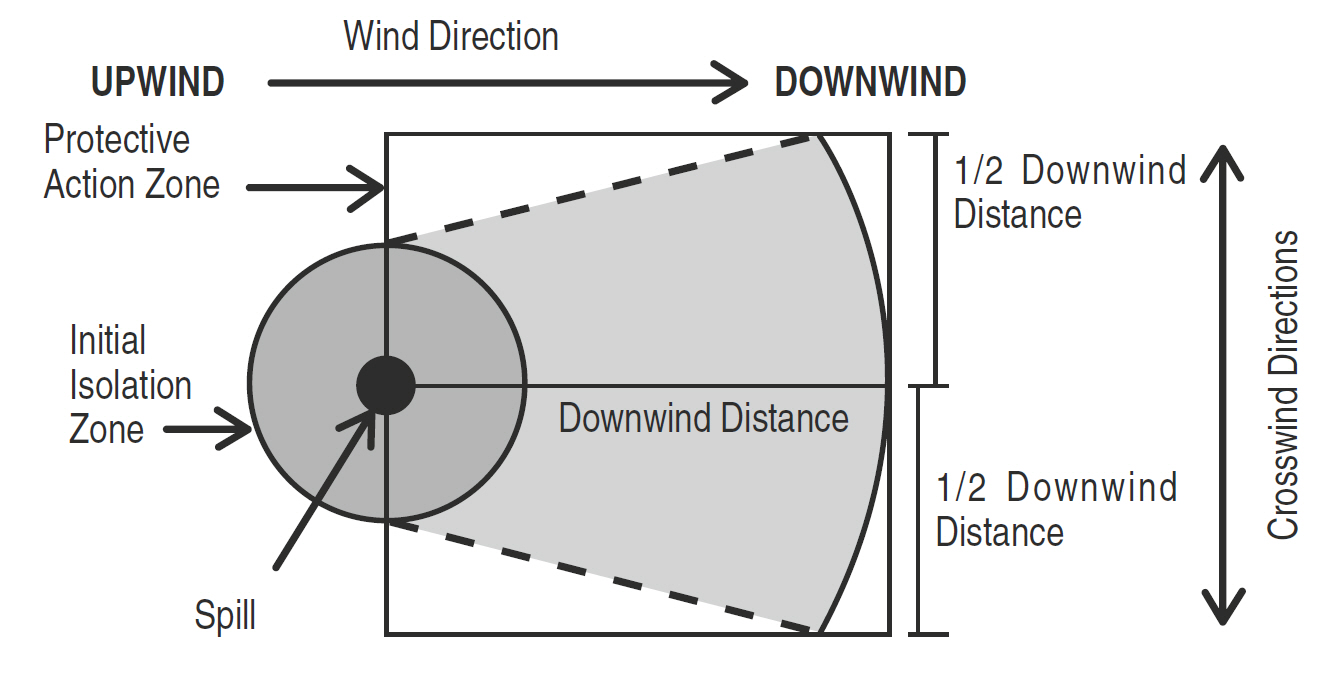
Isolation Zone (note: for Uranium Hexafluoride, Guide 166, has
additional isolation zone guidance.) |
Immediate
precautionary measure, isolate spill or leak area for at least 25m (75 feet)
in all directions. For
a large Spill consider 100m (330 feet) downwind For
a “large quantity involved in a fire” consider 300m (1000 feet) in all
directions. |
As an immediate precautionary
measure, isolate spill or leak area for at least 25m (75 feet) in all
directions Large Spill: Consider initial downwind
evacuation for at least 100m (330 feet). Fire: When a large quantity of this
material is involved in a major fire, consider an initial evacuation distance
of 300m (1000 feet) in all directions. |
Evacuate
Public Positive pressure
self-contained breathing apparatus (SCBA) and structural firefighters’ protective
clothing will provide adequate protection against internal radiation
exposure, but not external radiation exposure |
Pros: The ERG is considered a primary reference for the HAZMAT
community due to HAZWOPR training requirements and recommendations based on
the ERG will have broad acceptance. Cons: The recommendations are based on a transportation accident
and take into account the robust packaging and source controls required by
DOT.
Because of this, these controls may not be suitable for intentional
misuse of radioactive material. |
|
IAEA Manual for First Responders to a
Radiological Emergency, 2006 (IAEA, 2006)
|
Unshielded or
damaged potentially dangerous source (outside) |
Inner
cordoned area (also called the “Hot Zone”) |
30m in all
directions from the source |
Taken from Table 1 of the (IAEA, 2006) and provides
suggestions for the approximate size of the inner cordoned area for various
radiological emergencies. These sizes are based on an examination of
emergencies involving the largest amounts of radioactive material that could
be encountered and on international guidance for transport. The actual boundaries should be defined in the way that they
are easily recognizable (e.g. roads) and secured. However, the safety
perimeter should be established at least as far from the source as indicated
in Table 1 from (IAEA, 2006), until the radiological assessor has assessed
the situation. |
Precautions
should be taken to protect the responders and the public from potential
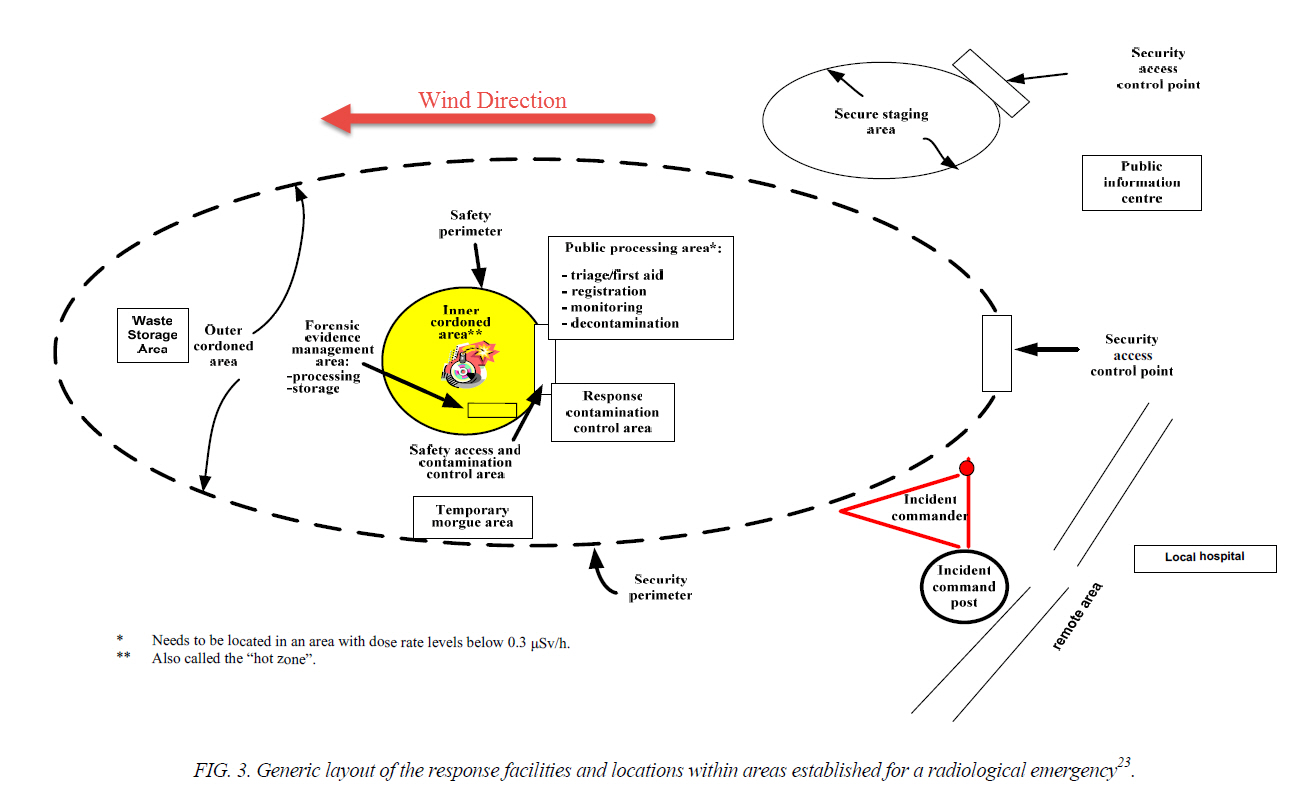
external exposure and contamination. The
first responders should establish, as appropriate, facilities and areas shown
in Figure. |
Pros: The IAEA 1st responder guidance is very similar to
the ERG (30m instead of 25m) for damaged/unshielded source, except they added
RDD guidance (2 rows below) and state their recommendations could be applied
outside of the transportation accident scenario. Cons: Presumes accident not
intentional exposure. Presumed
source sizes are still based on an examination of emergencies involving the
largest amounts of radioactive material that could be encountered and on
international guidance for transport. |
|
IAEA Manual for First Responders to a
Radiological Emergency, 2006 (IAEA, 2006)
|
Major spill from a potentially dangerous
source (outside) |
Inner cordoned area (also called the “Hot Zone”) |
100m
in all directions from the source |
same as above |
same as above |
Pros: The IAEA 1st responder guidance is the same as the
ERG for the “Major Spill” category, except they state their recommendations
could be applied outside of the transportation accident scenario. Cons:
Presumes accident not intentional exposure. Presumed source sizes are still based on an examination of
emergencies involving the largest amounts of radioactive material that could
be encountered and on international guidance for transport. |
|
IAEA Manual for First Responders to a
Radiological Emergency, 2006 (IAEA, 2006)
|
Fire, explosion or fumes involving a potentially dangerous
source (outside) |
Inner
cordoned area (also called the “Hot Zone”) |
300m in all directions
from the source |
same as above |
same as above |
Pros: The IAEA 1st responder guidance is the same as the
ERG for the “Fire/Explosion” category, except they state their
recommendations could be applied outside of the transportation accident
scenario. Cons: Presumes accident not
intentional. Presumed source sizes are still
based on an examination of emergencies involving the largest amounts of
radioactive material that could be encountered and on international guidance
for transport. |
|
IAEA Manual for First Responders to a
Radiological Emergency, 2006 (IAEA, 2006)
|
Damage, loss of shielding or spill
involving a potentially dangerous source (inside a building) |
Inner cordoned area (also called the “Hot Zone”) |
Affected and adjacent areas (including floors above and below) |
same as above |
same as above |
Pros: The IAEA 1st responder guidance is currently the
only guidance for an indoor accident. Although recommendations are common
sense, it is nice to have a reference. Cons:
Can only be used for indoor event. |
|
IAEA Manual for First Responders to a
Radiological Emergency, 2006 (IAEA, 2006)
|
Fire or other event involving a potentially dangerous source
(inside a building) that can spread materials throughout the building (e.g.
through the ventilation system) |
Inner
cordoned area (also called the “Hot Zone”) |
Entire building and appropriate outside distance as indicated
above |
same as above |
same as above |
Pros: The IAEA 1st responder guidance is currently the
only guidance for an indoor accident. Although recommendations are common
sense, it is nice to have a reference. Cons: Can only be used for indoor
event. |
|
IAEA Manual for First Responders to a
Radiological Emergency, 2006 (IAEA, 2006)
|
Suspected bomb (potential RDD), exploded or unexploded |
Inner cordoned area (also called the “Hot Zone”) |
400 m radius or more to protect against an explosion |
same as above |
same as above |
Pros: The IAEA 1st responder guidance is similar to the
ERG except for this “RDD” category.
Includes unexploded RDD concerns. Cons: It is unclear how the 400m
distance was derived, but may be driven by explosive (shrapnel) protection as
much as radiological issues. |
|
RDD Response Guidance; Planning for the First 100 Minutes (DHS, 2017)
|
Explosive RDD (Dirty Bomb) Incidents |
Hot Zone Shelter-in-Place
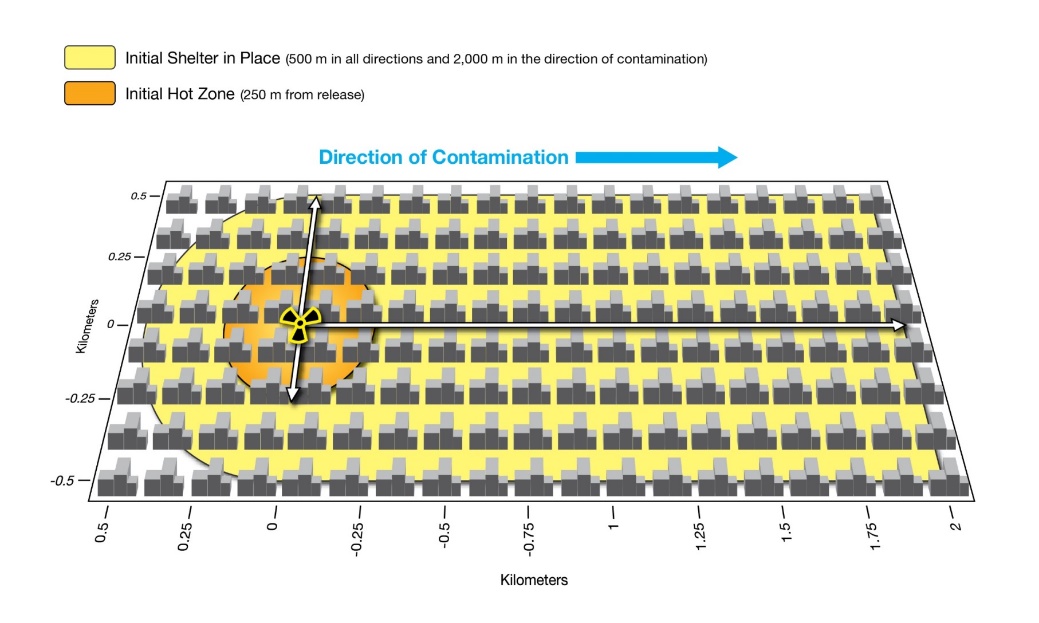
Zone |
250m in all direction
(Hot Zone) 500m in all
Directions and 2,000m downwind (Shelter-in-Place Zone) |
Until radiological measurements
are available, enforce the initial Shelter-in-Place Zone set at 500 m (~1600
ft) in all directions from the point of detonation. When the direction of the
contamination is confirmed by radiological measurements, extend the
Shelter-in-Place Zone out to 2000 m (~1.2 miles) in the direction of the
contamination to protect the public from low-level contamination and external
radiation from fallout on the ground (see Figure) |
Hot Zone entry should be limited to first
responders conducting lifesaving rescue operations. First responders should continue to operate
as needed in the Shelter-in-Place Zone, but all members of the general public
should be instructed to remain indoors until notified when and how to leave
the immediate area. |
Pros: Based on extensive testing of explosive dispersal of RDD
material and likely “worst case” source sizes. Assessment includes the possible range of
ballistic fragments and hazardous “smoke” contamination. The guidance provides initial protective
ranges to avoid deterministic effects and minimize exposure. Cons: Optimized for the urban
environment where manageable area can be limited. In sub-urban or rural areas,
or if a very large source (i.e., > 10,000Ci) is suspected, consider larger
initial areas. |
|
Updated
Emergency Response Guidance for The First 48 H After
the Outdoor Detonation of An Explosive Radiological Dispersal Device, (Musolino,
2013)
|
RDD Incidents |
Hot Zone Shelter-in-Place
Zone |
250m
in all direction (Hot Zone) 500m
in all Directions and 2,000m downwind (Shelter-in-Place Zone) |
The two key zones are overlaid
on a notional dense urban environment: (1) an initial Hot Zone that extends
250 m in all directions from the site of the incident; and (2) a wider
initial Shelter-in-Place Zone, 500 m in all directions from the incident site
and 2,000 m downwind. |
Once sufficient quantitative radiation
measurements are collected and mapped, the recommendations by the National
Council of Radiation Protection and Measurements should be used to define the
Hot Zone boundary more precisely (NCRP 165) |
This is the application of technical data
produced by the national laboratories that was operationalized by experts in
emergency response. It is the technical
basis for the DHS RDD Response Guidance (same
pros/cons). |
|
FRMAC Assessment Manual Volume 2
(DOE, 2010) No Diagram |
RDD |
Hot Zone, or boundary |
Within 500 m |
The area of highest concern is
limited to the area within 500 m of the release in the more probable
scenarios. The area of highest concern is defined as the area in which acute
effects, a lifetime inhalation dose of 1 Sv (100 rem) or a 50 mSv (5 rem)
groundshine dose (5-hour exposure), might occur. This implies that the
initial response should be to set up a Hot Zone, or boundary, within 500 m
(if nothing is known about the release) or at 0.01 Gy/h (1 rad/h) if exposure
rate measurements are available (HARPER05). |
|
Based on 2007 work by Fred
Harper and Musolino which evaluated a large number of RDD surrogate tests and
looked at the potential impacts of very large sources. This reference has been superseded by the
2013 “
Updated Emergency Response Guidance for The First 48 H
After the Outdoor Detonation of an Explosive Radiological Dispersal Device”
which updated the guidance based on additional tests and operational
considerations. The update resulted in
a smaller Hot Zone area for the urban environment and the addition of the
control zone for Shelter area that matched the 500m radius.
Pros: Based on extensive testing of explosive dispersal of RDD
material and likely “worst case” source sizes. Can be useful for non-urban
environments. Cons: The 500m recommendation was
updated with additional studies and operational information for the urban
environment. The smaller ranges in
the RDD response guidance should be used, especially in an urban environment. |
|
No
Diagram |
RDD Incidents |
Hot Zone |
500 m in all directions |
For an RDD, an initial Hot Zone
boundary should be established ~1,600 feet (500 m) in all directions from the
point of dispersion until measurements are made. If it is known that the source
used in the incident had an activity <10,000 Ci (370 TBq), then the
initial Hot Zone boundary can be established at a radius of ~800 feet (250
m). (Musolino and Harper, 2006). |
Emergency responders who enter
the Hot Zone should be equipped with radiation monitoring equipment that
provides unambiguous alarms, based on predefined levels, to facilitate
decision making. It is recommended that the instrument alarm when the
exposure rate reaches 10 R/h (~0.1 Gy/h), corresponding to the recommended
value for the inner perimeter of the dangerous-radiation zone, and when the
cumulative absorbed dose reaches the decision dose of 50 rad (0.5 Gy) (NCRP,
2005). PUBLIC
Recommendation: NCRP recommends that the initial
public protective action for both radionuclide dispersion incidents and
nuclear detonations be early,
adequate sheltering followed by delayed, informed evacuation. Until the level and extent of
contamination can be determined, efforts
should be made to avoid being outdoors in potentially-contaminated areas |
Based on 2007 work by Fred
Harper and Musolino which evaluated a large number of RDD surrogate tests and
looked at the potential impacts of very large sources. This reference has been superseded by the
2013 “Updated Emergency Response Guidance for The First 48 H
After the Outdoor Detonation of an Explosive Radiological Dispersal Device”
which updated the guidance based on additional tests and operational
considerations. The update resulted in
a smaller Hot Zone area for the urban environment and the addition of the
control zone for Shelter area that matched the 500m radius. Pros: Based on extensive testing of explosive dispersal of RDD
material and likely “worst case” source sizes. Can be useful for non-urban
environments. Cons:
The 500m
recommendation was updated with additional studies and operational
information for the urban environment.
The smaller ranges in the RDD response guidance should be used,
especially in an urban environment. |
|
|
|
|
|
|
|
|